
Itty bitty lid space can be the bane of an eyeliner lovers existence sometimes. The Classic cat eye flick doesn't seem to ever look quite right does it? Granted my eyes are semi-hooded (rather Emma Stone'ish) but I still struggle with Winged Liner. So here are 4 pictorials for winged liner for you guys to try yourselves. With 4 different variations.
The Underliner


Possibly the most foolproof of them all is the Underliner. I think I can say (almost) that most hooded and semi-hooded eyes can all pull this one off. What makes it work so well is instead of localising the line on the top lash line you pull it to continue off on the lower lash line.
1) Starting off with a primed eye and a nice dusting of flesh toned shadow.
2) In order to make sure the eye doesn't look too bottom heavy a light shading brown can be blended above the crease.
3) Starting with a warm brown, map your wing. Don't worry if you've made it too thick because...
4) We're going to blend the fuck out of it.
5) Go in with a deeper shade but keep the line tight to the lash line.
6) Blend the Mo'Fo.
7) Next we'll be tightlining (to ensure the eye isn't too bottom heavy again) and lining the waterline.
8) Give the lower lash line a blending with a small brush to meld the waterline and lash line together and finish with mascara.
The Half Wing


Not brave enough to tackle a full on wing? No worries. The Half Wings got you!
1) I usually start off with primed lids and a flesh toned shadow.
2) And a little bit of shading above the crease.
3) Tightlining is especially important for this wing I find. It blends the line you wing travels on towards the middle of your eye so that it trails off seamlessly.
4) Optional step. I decided to smudge my upper lash line a bit. I was feeling grunge that day.
5) To map your wing placement take a business card or something similar and use it to mark the tail with a medium brown.
6) I then go in and outline how thick I want the flick to be.
7) Finally I fill it in and add a touch of mascara.
The Gradient

This ones a bit of an interesting one. Most of the wing is located thickly and exclusively outside of the eye. Giving you a visible wing and elongated eyes.
1) For this pictorial we've begun with primed eyes that are already shaded with a warm brown along the crease.
2) Using a very small pencil brush map the outer corner or your wing and above your natural crease.
3) What we're going to do now is a series of lightly filling in and blending to the inner corner as we go to maintain the gradience. Keep doing it until your happy but remember to work with small amounts.
4) Go back over the far outer corner and the lower line of the tail to reinstate some sharpness to the wing.
5) And add a happy coat of mascara.
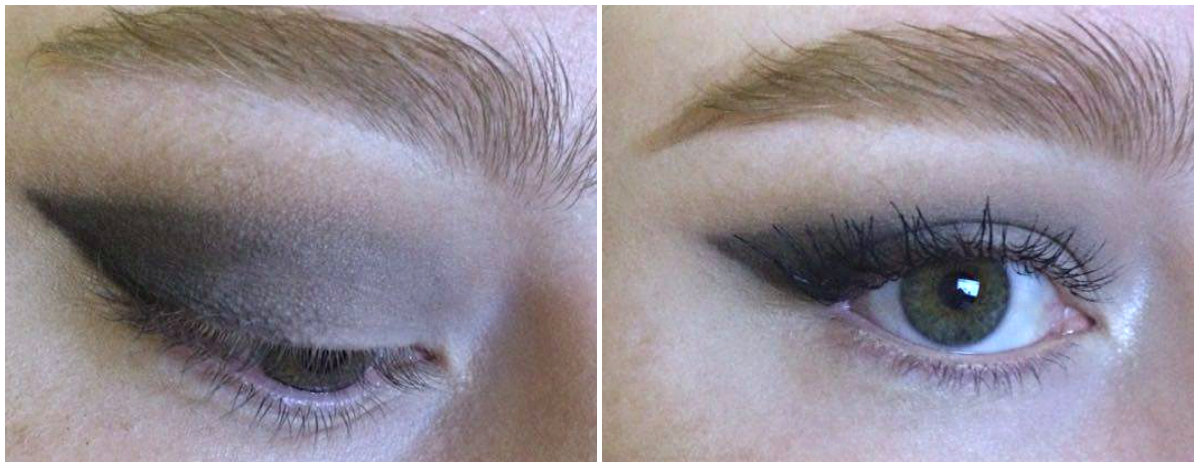
The Sharp Smokey Liner


Sharp smokey liner is one of the more dramatic classic looking wings. Simple but oh so bold.
1) Starting with a freshly primed eye, use some tape to help stencil your wing.
2) Blend on and above the crease with a warm shading brown and blend it somewhat higher than you normally would.
3) Start adding black. The placement of the black is primarily going to be along your visible lid. The shape of it will create the look of somewhat typical winged liner. Work in small amounts, building the intensity and blending as you go.
4) Once you're happy remove the tape. And lightly go over the edged of the black with some shading brown again. Apply some concealer and powder where the tape was as you may have lost some coverage in your base.
5) Finally add a few coats of mascara. I added a lot of individual lashes but it's completely up to you!
I hope the pictorials are helpful and useful to you all!
Gidget xx


Love the tips - Thank you!
ReplyDeleteHappy to help 💋
DeleteThese are fantastic thank you!! What great tips :)
ReplyDeleteNo problem. I'm so happy to hear you like it xx
Deletesuch great advice! You rock the underwing so well too!!
ReplyDeleteLauren | www.lifewithlozzn.com
I'm so happy to hear you enjoyed it. And thank you! ☺️
Delete